# xiaohongshu-mcp
[](#contributors-)
MCP for RedNote (Xiaohongshu) platform.
- My blog article: [haha.ai/xiaohongshu-mcp](https://www.haha.ai/xiaohongshu-mcp)
## Star History
[](https://www.star-history.com/#xpzouying/xiaohongshu-mcp&Timeline)
**Main Features**
> 💡 **Tip:** Click on the feature titles below to expand and view video demonstrations
1. Login and Check Login Status
The first step is required - RedNote needs to be logged in. You can check current login status.
**Login Demo:**
https://github.com/user-attachments/assets/8b05eb42-d437-41b7-9235-e2143f19e8b7
**Check Login Status Demo:**
https://github.com/user-attachments/assets/bd9a9a4a-58cb-4421-b8f3-015f703ce1f9
2. Publish Image and Text Content
Supports publishing image and text content to RedNote, including title, content description, and images. More publishing features will be supported later.
**Publish Image-Text Post Demo:**
https://github.com/user-attachments/assets/8aee0814-eb96-40af-b871-e66e6bbb6b06
3. Search Content
Search RedNote content by keywords.
**Search Posts Demo:**
https://github.com/user-attachments/assets/03c5077d-6160-4b18-b629-2e40933a1fd3
4. Get Recommendation List
Get RedNote homepage recommendation content list.
**Get Recommendation List Demo:**
https://github.com/user-attachments/assets/110fc15d-46f2-4cca-bdad-9de5b5b8cc28
5. Get Post Details (Including Interaction Data and Comments)
Get complete details of RedNote posts, including:
- Post content (title, description, images, etc.)
- User information
- Interaction data (likes, favorites, shares, comment count)
- Comment list and sub-comments
**⚠️ Important Note:**
- Both post ID and xsec_token are required (both parameters are essential)
- These two parameters can be obtained from Feed list or search results
- Must login first to use this feature
**Get Post Details Demo:**
https://github.com/user-attachments/assets/76a26130-a216-4371-a6b3-937b8fda092a
6. Post Comments to Posts
Supports automatically posting comments to RedNote posts.
**Feature Description:**
- Automatically locate comment input box
- Input comment content and publish
- Supports HTTP API and MCP tool calls
**⚠️ Important Note:**
- Must login first to use this feature
- Need to provide post ID, xsec_token, and comment content
- These parameters can be obtained from Feed list or search results
**Post Comment Demo:**
https://github.com/user-attachments/assets/cc385b6c-422c-489b-a5fc-63e92c695b80
**RedNote Basic Operation Knowledge**
- **Title: (Very Important) RedNote requires titles to not exceed 20 characters**
- Currently only supports image-text posting: From a recommendation perspective, image-text posts get better traffic than pure text.
- (Low priority) Video and pure text support can be considered. 1. I personally feel these two would greatly increase operation complexity; 2. These two types have low value in my use scenarios.
- Tags: Will be supported soon.
- According to my practical experience, RedNote should allow **50 posts** per day.
- **(Very Important) RedNote does not allow the same account to login on multiple web platforms**. If you login to the current xiaohongshu-mcp, don't login to that account on other web platforms, otherwise it will "kick out" the current MCP account login. You can use the mobile app to check current account information.
**Risk Explanation**
1. This project is open-sourced based on another project of mine. The original project has been running stably for over a year without any account bans, only occasional cookie expiration requiring re-login.
2. I used Claude Code CLI integration and verified stable automated operation for several weeks before open-sourcing.
This project is for learning purposes only. All illegal activities are prohibited.
**Practical Results**
First day likes/favorites reached 999+,

 Results after about a week
 ## 1. Usage Tutorial
### 1.1. Quick Start (Recommended)
**Method 1: Download Pre-compiled Binaries**
Download pre-compiled binaries for your platform directly from [GitHub Releases](https://github.com/xpzouying/xiaohongshu-mcp/releases):
**Main Program (MCP Service):**
- **macOS Apple Silicon**: `xiaohongshu-mcp-darwin-arm64`
- **macOS Intel**: `xiaohongshu-mcp-darwin-amd64`
- **Windows x64**: `xiaohongshu-mcp-windows-amd64.exe`
- **Linux x64**: `xiaohongshu-mcp-linux-amd64`
**Login Tool:**
- **macOS Apple Silicon**: `xiaohongshu-login-darwin-arm64`
- **macOS Intel**: `xiaohongshu-login-darwin-amd64`
- **Windows x64**: `xiaohongshu-login-windows-amd64.exe`
- **Linux x64**: `xiaohongshu-login-linux-amd64`
Usage Steps:
```bash
# 1. First run the login tool
chmod +x xiaohongshu-login-darwin-arm64
./xiaohongshu-login-darwin-arm64
# 2. Then start the MCP service
chmod +x xiaohongshu-mcp-darwin-arm64
./xiaohongshu-mcp-darwin-arm64
```
**⚠️ Important Note**: The headless browser will be automatically downloaded on first run (about 150MB), please ensure a stable network connection. Subsequent runs will not require re-downloading.
**Method 2: Build from Source**
## 1. Usage Tutorial
### 1.1. Quick Start (Recommended)
**Method 1: Download Pre-compiled Binaries**
Download pre-compiled binaries for your platform directly from [GitHub Releases](https://github.com/xpzouying/xiaohongshu-mcp/releases):
**Main Program (MCP Service):**
- **macOS Apple Silicon**: `xiaohongshu-mcp-darwin-arm64`
- **macOS Intel**: `xiaohongshu-mcp-darwin-amd64`
- **Windows x64**: `xiaohongshu-mcp-windows-amd64.exe`
- **Linux x64**: `xiaohongshu-mcp-linux-amd64`
**Login Tool:**
- **macOS Apple Silicon**: `xiaohongshu-login-darwin-arm64`
- **macOS Intel**: `xiaohongshu-login-darwin-amd64`
- **Windows x64**: `xiaohongshu-login-windows-amd64.exe`
- **Linux x64**: `xiaohongshu-login-linux-amd64`
Usage Steps:
```bash
# 1. First run the login tool
chmod +x xiaohongshu-login-darwin-arm64
./xiaohongshu-login-darwin-arm64
# 2. Then start the MCP service
chmod +x xiaohongshu-mcp-darwin-arm64
./xiaohongshu-mcp-darwin-arm64
```
**⚠️ Important Note**: The headless browser will be automatically downloaded on first run (about 150MB), please ensure a stable network connection. Subsequent runs will not require re-downloading.
**Method 2: Build from Source**
Build from Source Details
Requires Golang environment. For installation instructions, please refer to [Golang Official Documentation](https://go.dev/doc/install).
Set Go domestic proxy source:
```bash
# Configure GOPROXY environment variable, choose one of the following three
# 1. Qiniu CDN
go env -w GOPROXY=https://goproxy.cn,direct
# 2. Alibaba Cloud
go env -w GOPROXY=https://mirrors.aliyun.com/goproxy/,direct
# 3. Official
go env -w GOPROXY=https://goproxy.io,direct
```
For Windows issues, check here first: [Windows Installation Guide](./docs/windows_guide.md)
### 1.2. Login
First time requires manual login to save RedNote login status.
**Using Binary Files:**
```bash
# Run the login tool for your platform
./xiaohongshu-login-darwin-arm64
```
**Using Source Code:**
```bash
go run cmd/login/main.go
```
### 1.3. Start MCP Service
Start xiaohongshu-mcp service.
**Using Binary Files:**
```bash
# Default: Headless mode, no browser interface
./xiaohongshu-mcp-darwin-arm64
# Non-headless mode, with browser interface
./xiaohongshu-mcp-darwin-arm64 -headless=false
```
**Using Source Code:**
```bash
# Default: Headless mode, no browser interface
go run .
# Non-headless mode, with browser interface
go run . -headless=false
```
## 1.4. Verify MCP
```bash
npx @modelcontextprotocol/inspector
```
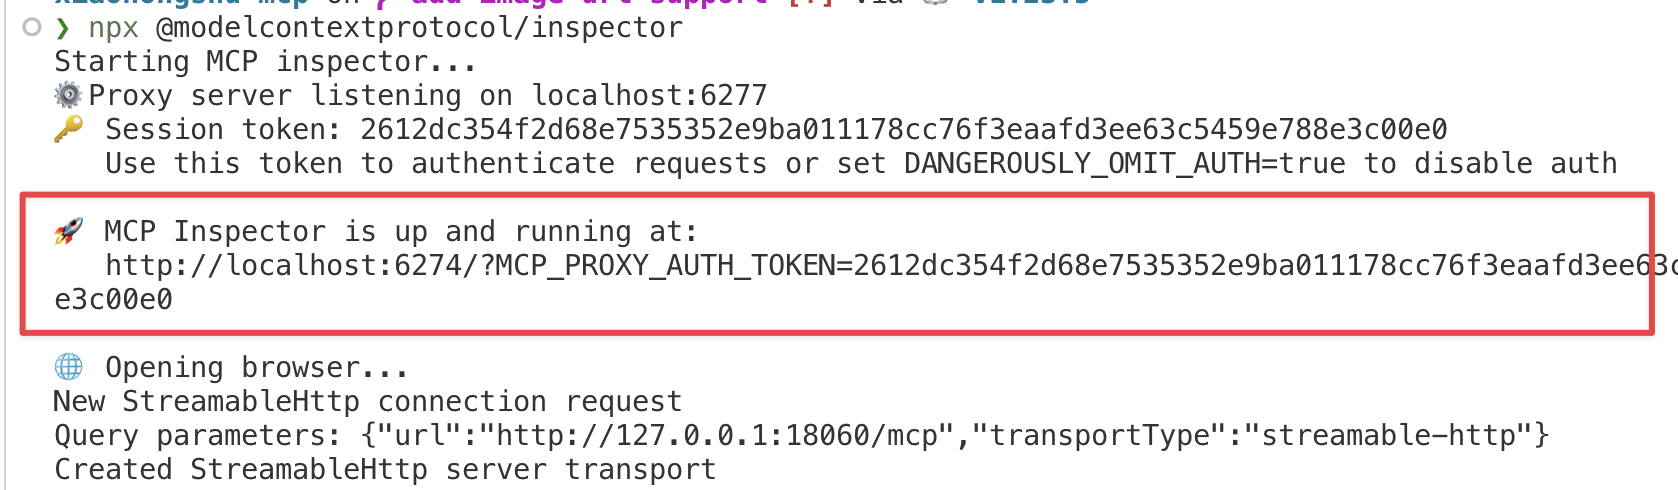
After running, open the red-marked link, configure MCP inspector, enter `http://localhost:18060/mcp`, and click the `Connect` button.
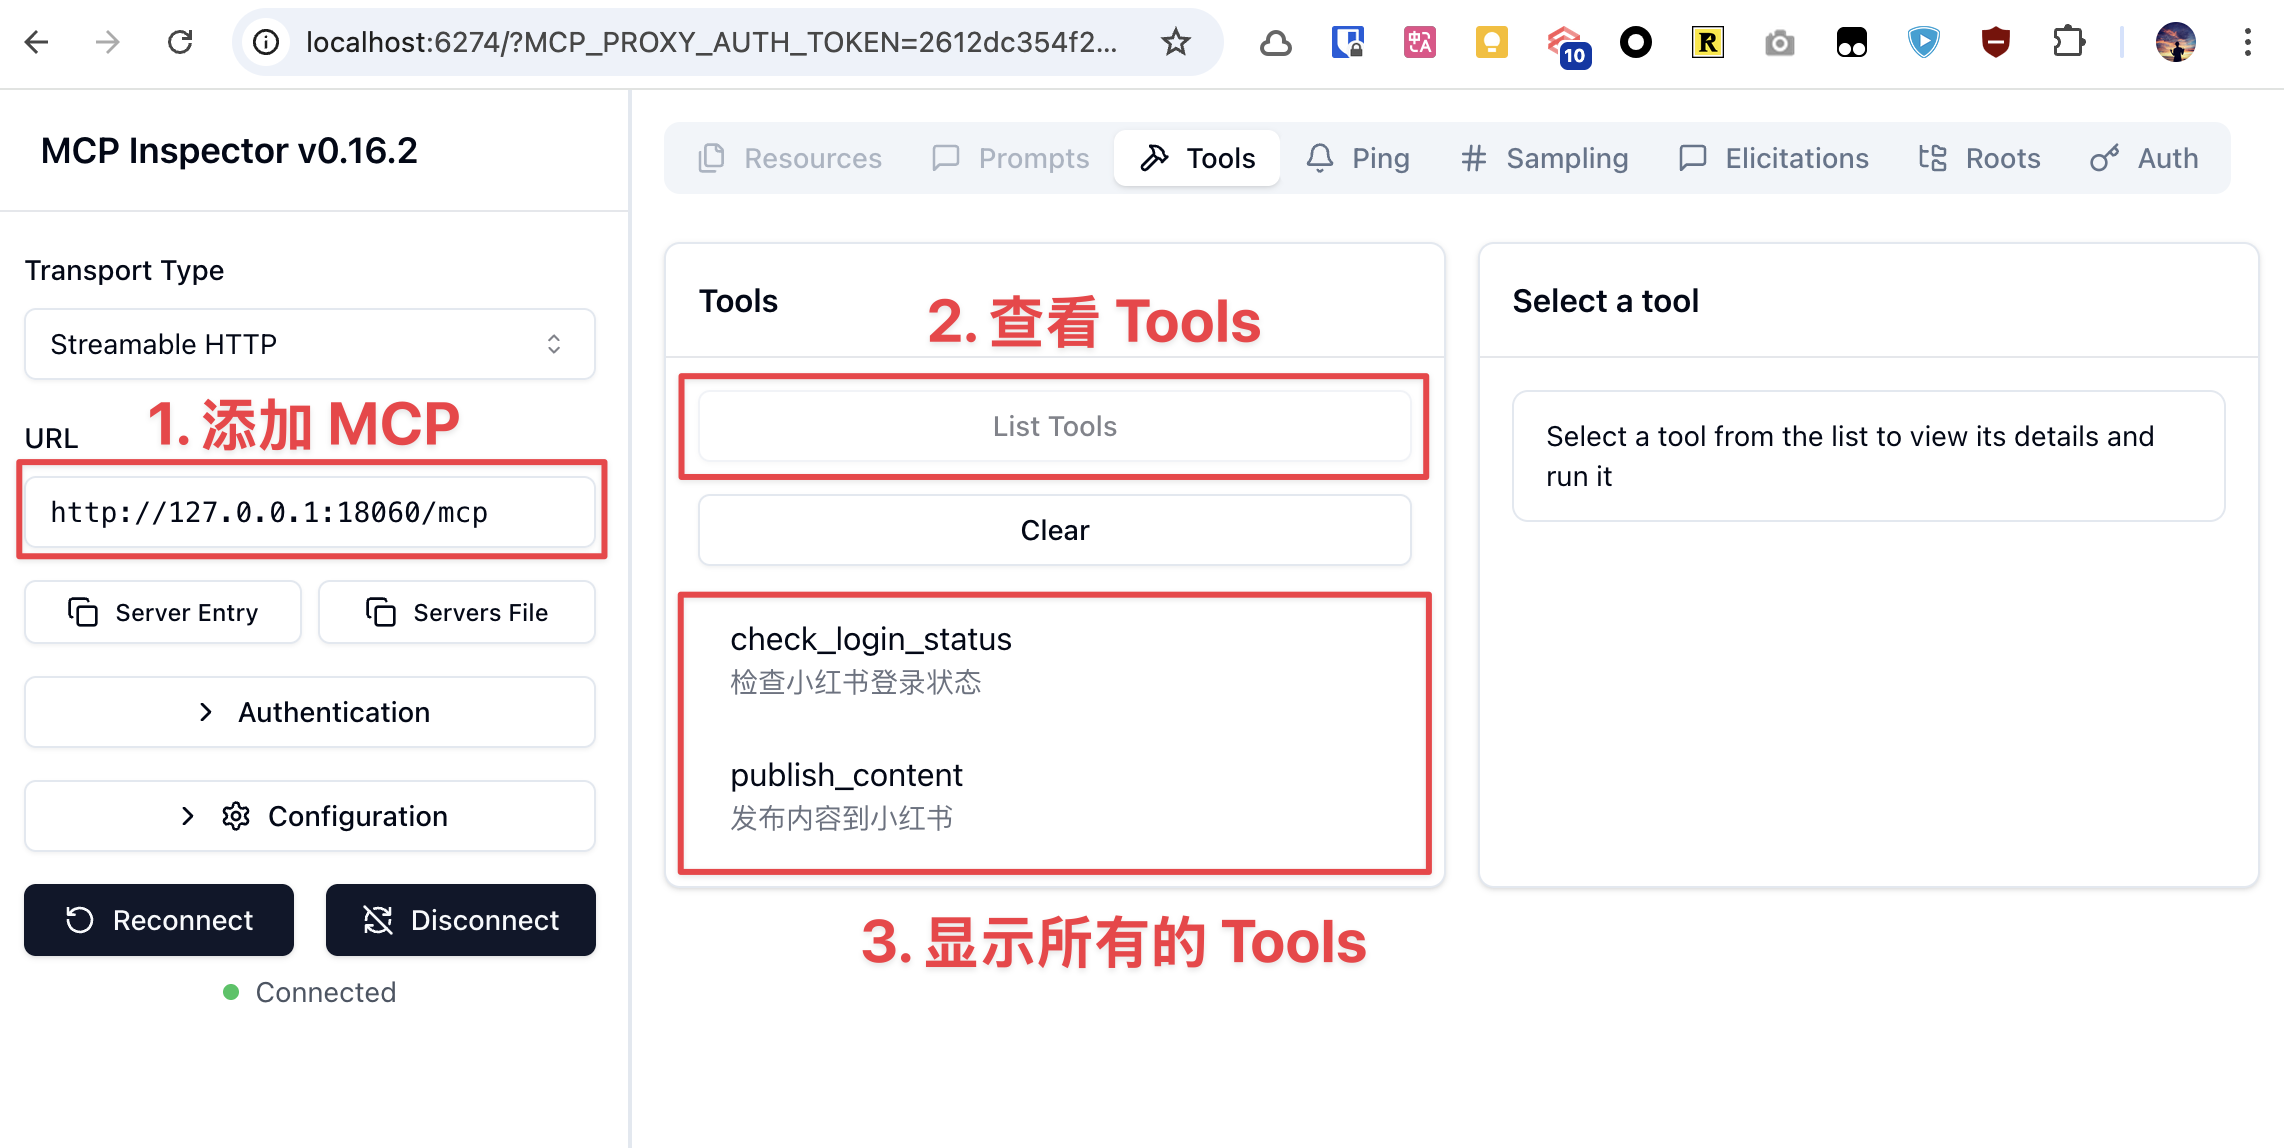
After configuring MCP inspector as above, click the `List Tools` button to view all Tools.
## 1.5. Use MCP for Publishing
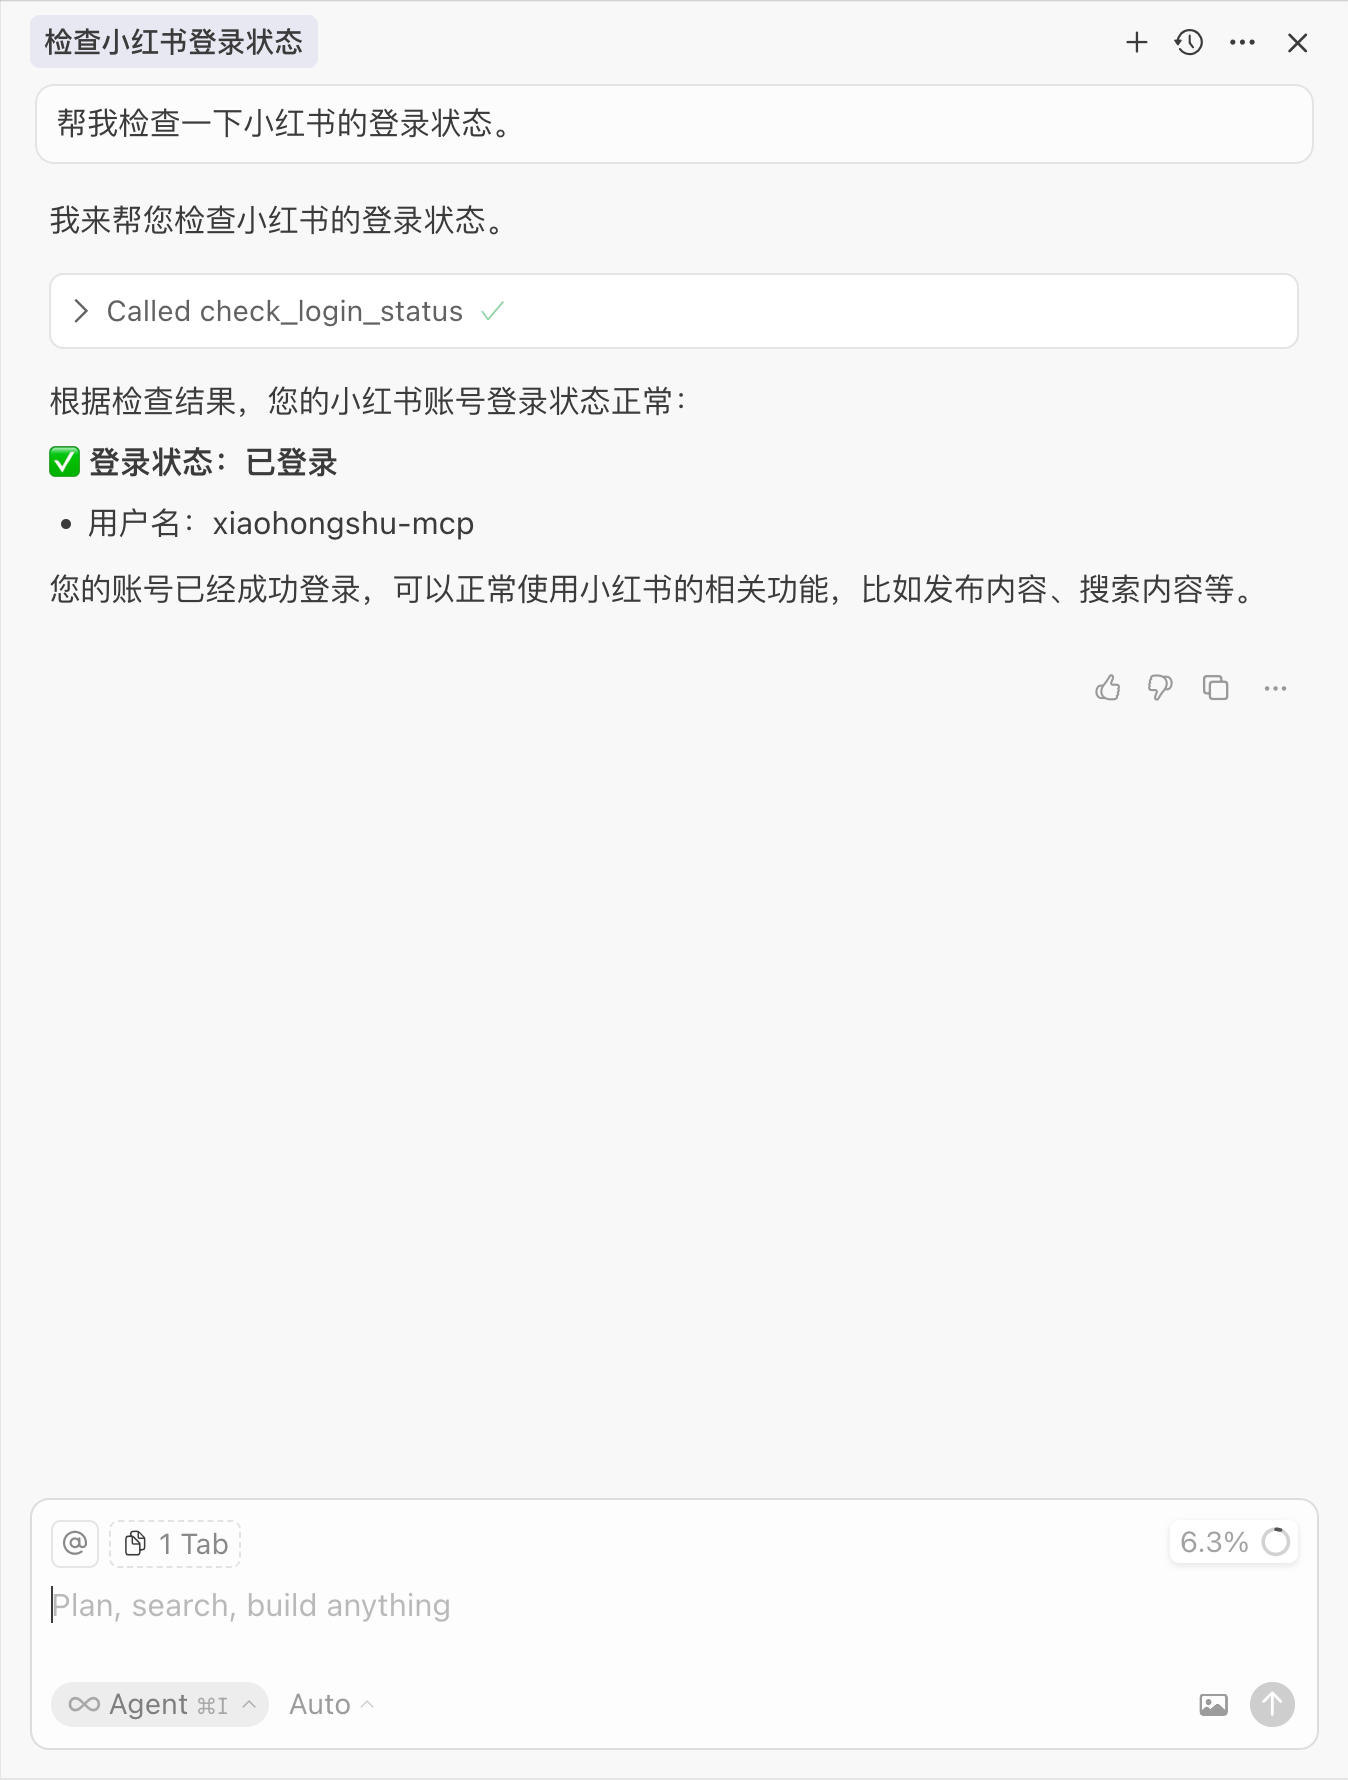
### Check Login Status
### Publish Image-Text
The example uses a random image from https://unsplash.com/ for testing.
### Search Content
Use search functionality to search RedNote content by keywords:

## 2. MCP Client Integration
This service supports the standard Model Context Protocol (MCP) and can integrate with various AI clients that support MCP.
### 2.1. Quick Start
#### Start MCP Service
```bash
# Start service (default headless mode)
go run .
# Or with interface mode
go run . -headless=false
```
Service will run at: `http://localhost:18060/mcp`
#### Verify Service Status
```bash
# Test MCP connection
curl -X POST http://localhost:18060/mcp \
-H "Content-Type: application/json" \
-d '{"jsonrpc":"2.0","method":"initialize","params":{},"id":1}'
```
#### Claude Code CLI Integration
```bash
# Add HTTP MCP server
claude mcp add --transport http xiaohongshu-mcp http://localhost:18060/mcp
```
### 2.2. Supported Clients
Claude Code CLI
Official command line tool, already shown in the quick start section above:
```bash
# Add HTTP MCP server
claude mcp add --transport http xiaohongshu-mcp http://localhost:18060/mcp
```
Cursor
#### Configuration File Method
Create or edit MCP configuration file:
**Project-level configuration** (recommended):
Create `.cursor/mcp.json` in project root directory:
```json
{
"mcpServers": {
"xiaohongshu-mcp": {
"url": "http://localhost:18060/mcp",
"description": "RedNote content publishing service - MCP Streamable HTTP"
}
}
}
```
**Global configuration**:
Create `~/.cursor/mcp.json` in user directory (same content).
#### Usage Steps
1. Ensure RedNote MCP service is running
2. Save configuration file and restart Cursor
3. In Cursor chat, tools should be automatically available
4. You can view connected MCP tools through "Available Tools" in the chat interface
**Demo**
Plugin MCP integration:
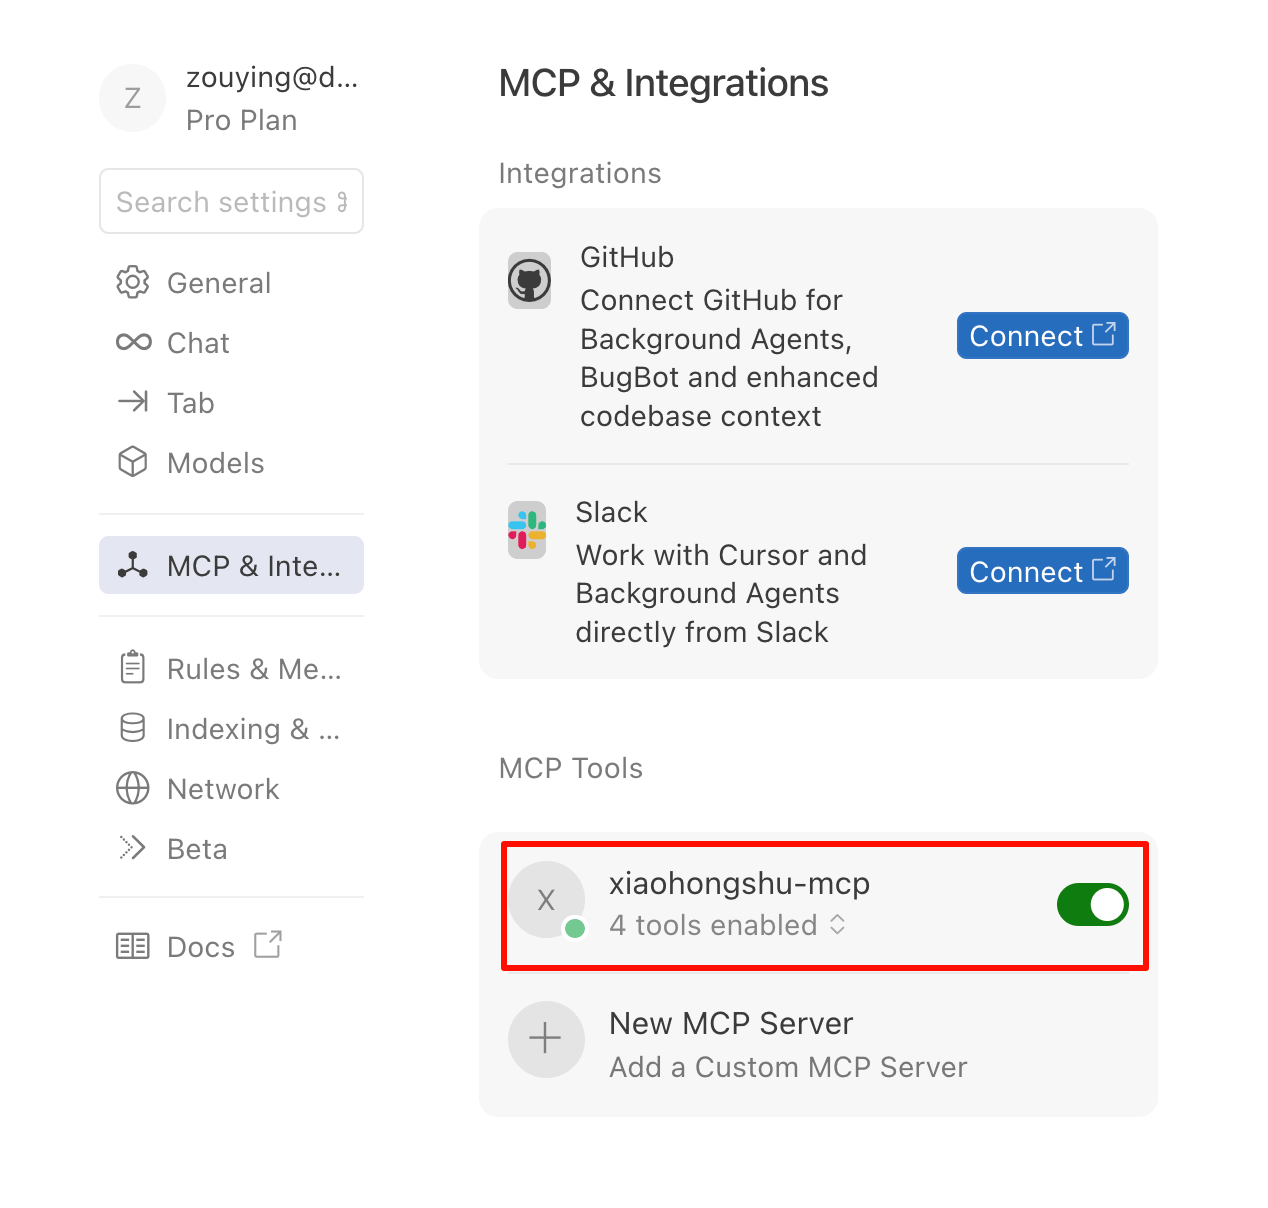
Call MCP tools: (using check login status as example)
VSCode
#### Method 1: Configure using Command Palette
1. Press `Ctrl/Cmd + Shift + P` to open command palette
2. Run `MCP: Add Server` command
3. Select `HTTP` method.
4. Enter address: `http://localhost:18060/mcp`, or modify to corresponding Server address.
5. Enter MCP name: `xiaohongshu-mcp`.
#### Method 2: Direct Configuration File Edit
**Workspace configuration** (recommended):
Create `.vscode/mcp.json` in project root directory:
```json
{
"servers": {
"xiaohongshu-mcp": {
"url": "http://localhost:18060/mcp",
"type": "http"
}
},
"inputs": []
}
```
**View Configuration**:
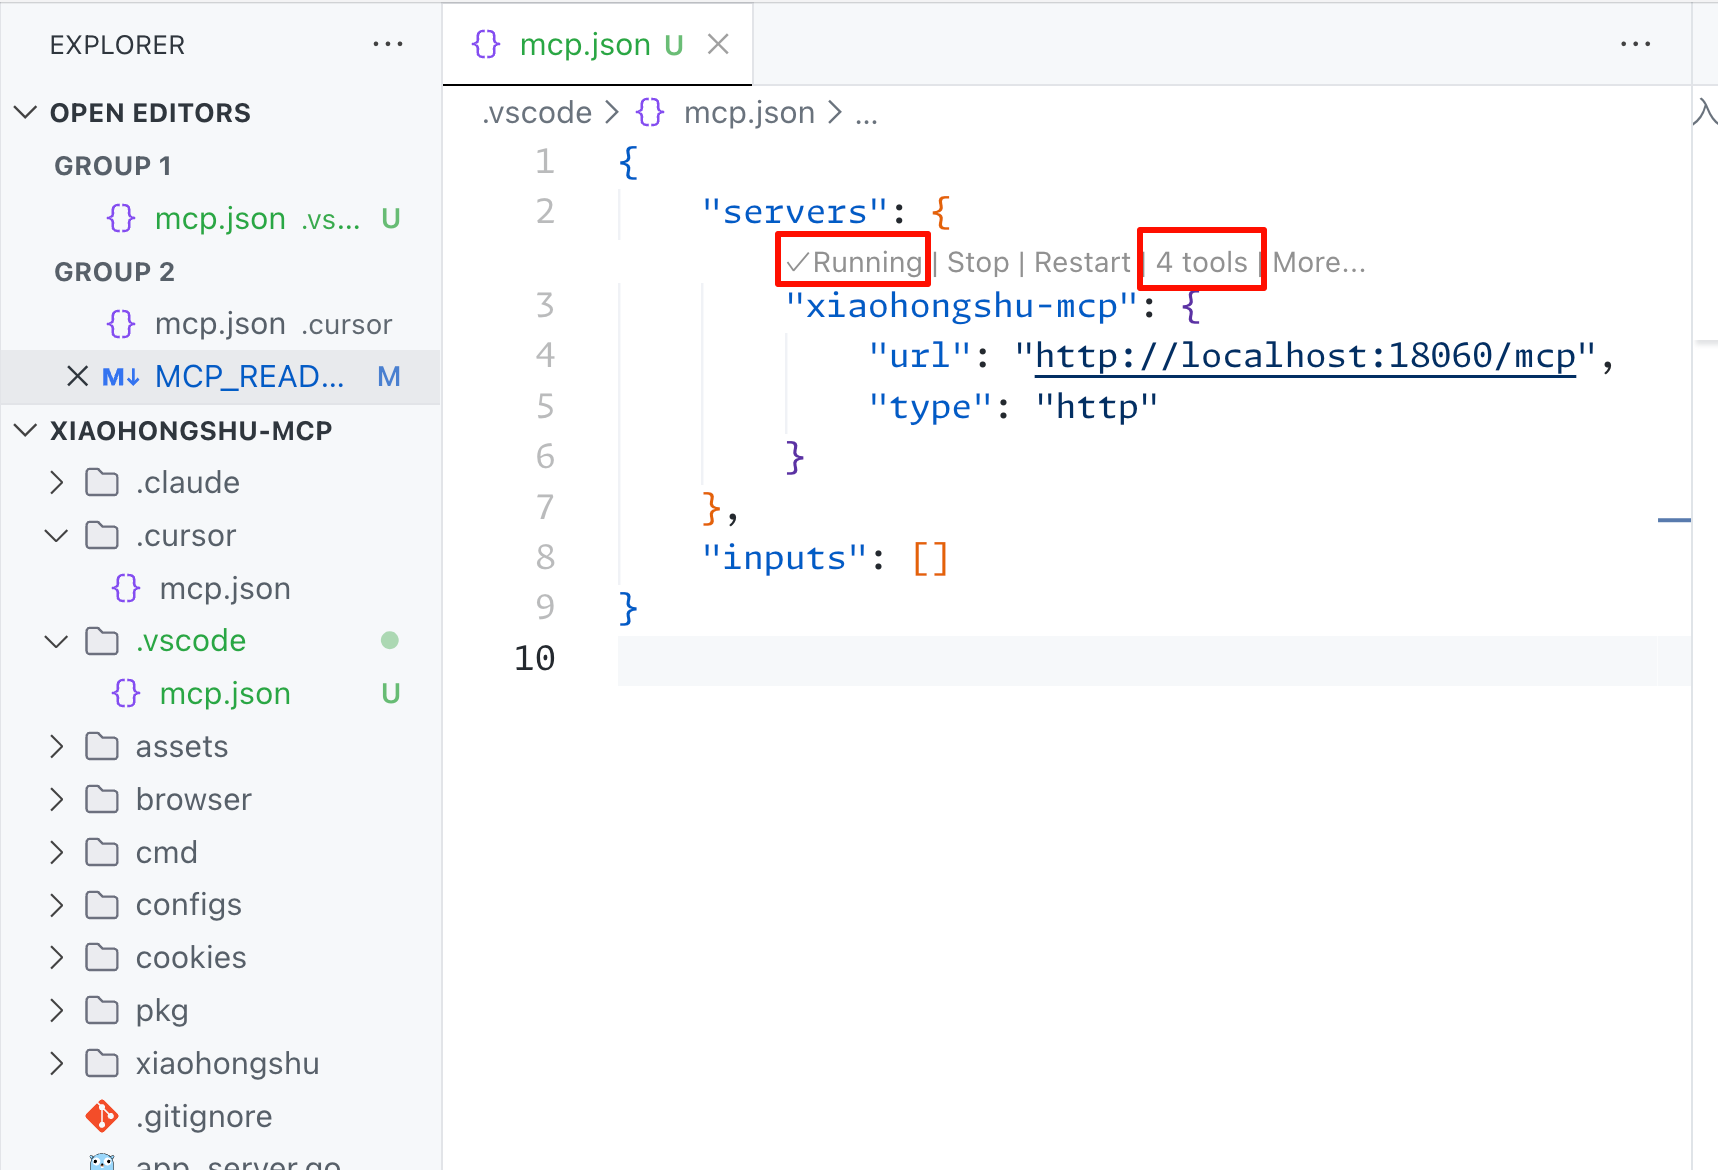
1. Confirm running status.
2. Check if `tools` are correctly detected.
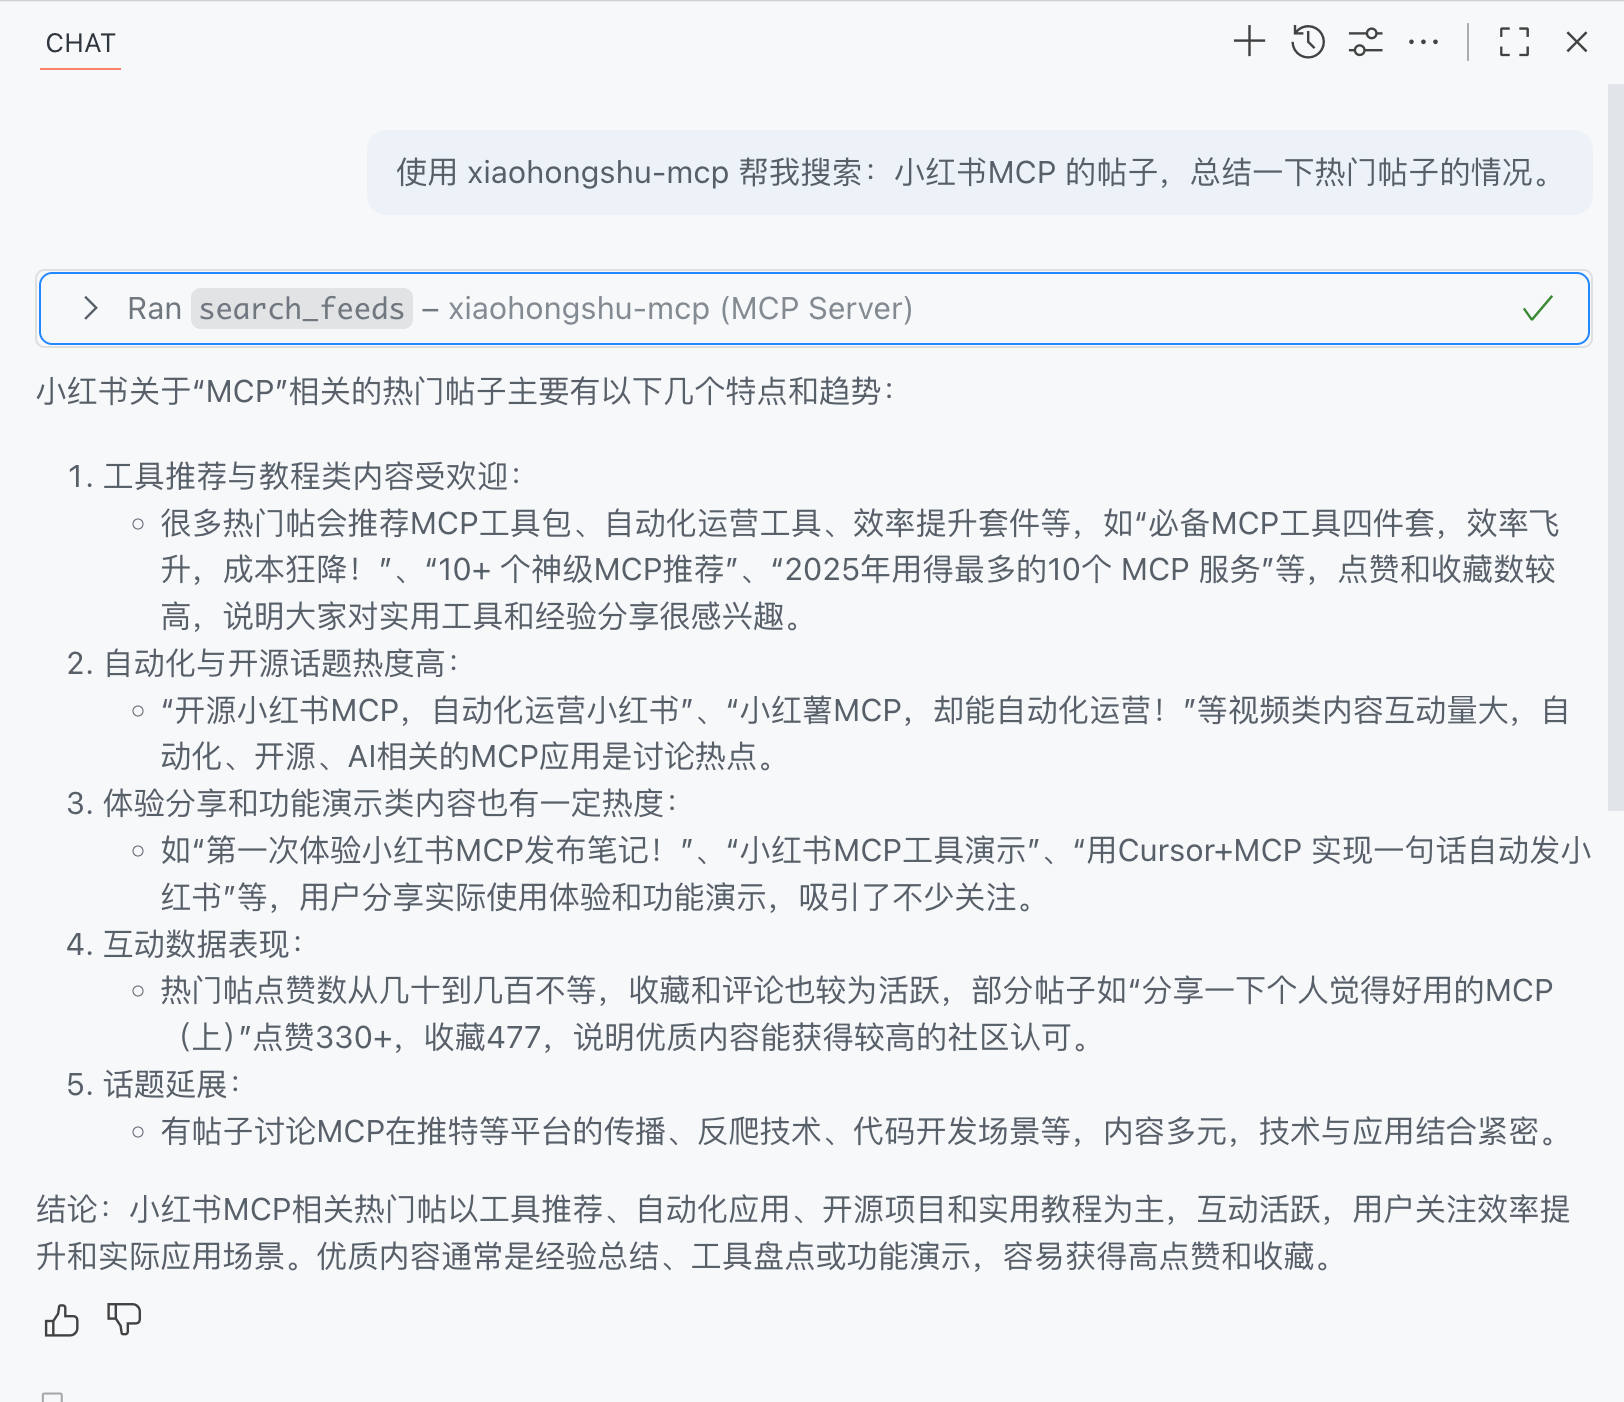
**Demo**
Using search post content as example:
Google Gemini CLI
Configure in `~/.gemini/settings.json` or project directory `.gemini/settings.json`:
```json
{
"mcpServers": {
"xiaohongshu": {
"httpUrl": "http://localhost:18060/mcp",
"timeout": 30000
}
}
}
```
For more information, please refer to [Gemini CLI MCP Documentation](https://google-gemini.github.io/gemini-cli/docs/tools/mcp-server.html)
MCP Inspector
Debug tool for testing MCP connections:
```bash
# Start MCP Inspector
npx @modelcontextprotocol/inspector
# Connect in browser to: http://localhost:18060/mcp
```
Usage steps:
- Use MCP Inspector to test connection
- Test Ping Server functionality to verify connection
- Check if List Tools returns 6 tools
Other HTTP MCP Supporting Clients
Any client supporting HTTP MCP protocol can connect to: `http://localhost:18060/mcp`
Basic configuration template:
```json
{
"name": "xiaohongshu-mcp",
"url": "http://localhost:18060/mcp",
"type": "http"
}
```
### 2.3. Available MCP Tools
After successful connection, you can use the following MCP tools:
- `check_login_status` - Check RedNote login status (no parameters)
- `publish_content` - Publish image-text content to RedNote (required: title, content, images)
- `list_feeds` - Get RedNote homepage recommendation list (no parameters)
- `search_feeds` - Search RedNote content (required: keyword)
- `get_feed_detail` - Get post details (required: feed_id, xsec_token)
- `post_comment_to_feed` - Post comments to RedNote posts (required: feed_id, xsec_token, content)
### 2.4. Usage Examples
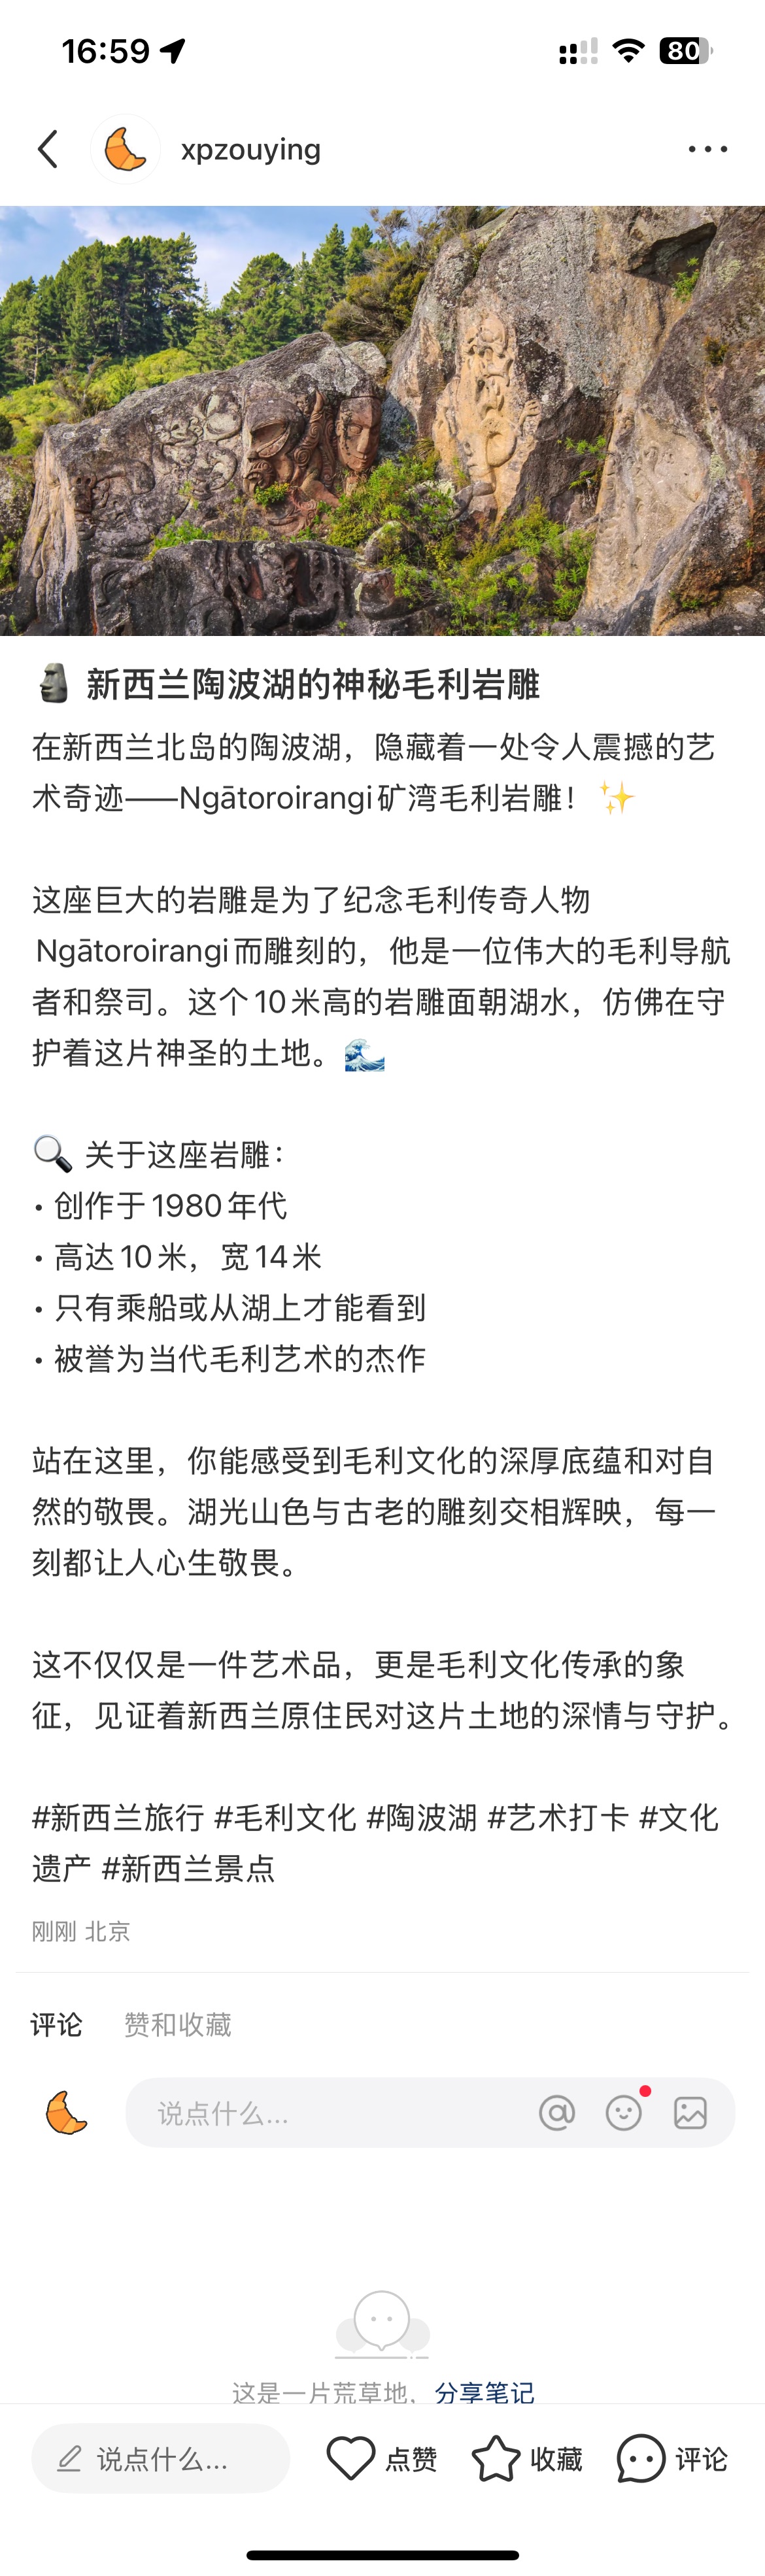
Using Claude Code to publish content to RedNote:
```
Help me write a post to publish on RedNote,
with image: https://cn.bing.com/th?id=OHR.MaoriRock_EN-US6499689741_UHD.jpg&w=3840
The image is: "Maori rock carving at Ngātoroirangi Mine Bay, Lake Taupo, New Zealand (© Joppi/Getty Images)"
Use xiaohongshu-mcp for publishing.
```
**Publishing Result:**
 ## ShowCase
Refer directly to user cases: [ShowCase](./examples/README.md)
1. [n8n Complete Tutorial](./examples/n8n/README.md)
2. [Cherry Studio Complete Tutorial](./examples/cherrystudio/README.md)
## RedNote MCP Community Group
Since the project has just started, there will be many issues. Let's create a group to discuss problems together and contribute to the open source project. ~~Scan my WeChat QR code to join the technical discussion group~~.
Due to too many people adding WeChat, WeChat banned my account for being "in an unsafe network environment." (Not sure if it's because of too many people, possibly triggering WeChat's telecom fraud safety detection. Tried: 1. Real-name verification; 2. Bank card binding; 3. Manual appeal; none worked.)
Switched to Feishu group, scan QR code to join directly
## ShowCase
Refer directly to user cases: [ShowCase](./examples/README.md)
1. [n8n Complete Tutorial](./examples/n8n/README.md)
2. [Cherry Studio Complete Tutorial](./examples/cherrystudio/README.md)
## RedNote MCP Community Group
Since the project has just started, there will be many issues. Let's create a group to discuss problems together and contribute to the open source project. ~~Scan my WeChat QR code to join the technical discussion group~~.
Due to too many people adding WeChat, WeChat banned my account for being "in an unsafe network environment." (Not sure if it's because of too many people, possibly triggering WeChat's telecom fraud safety detection. Tried: 1. Real-name verification; 2. Bank card binding; 3. Manual appeal; none worked.)
Switched to Feishu group, scan QR code to join directly
【Feishu Group 1】Full

【WeChat Group 1】Full

【WeChat Group 2】Full

| 【Feishu Group 2】: Scan to join | 【WeChat Group 3】: Scan to join |
| ------------------------------------------------------------------------------------------------------------------------- | -------------------------------------------------------------------------------------------------------------------------- |
|  |
|  |
## 🙏 Thanks to Contributors ✨
Thanks to all friends who have contributed to this project! (In no particular order)
### ✨ Special Thanks
| Contributors |
| --- |
| [
|
## 🙏 Thanks to Contributors ✨
Thanks to all friends who have contributed to this project! (In no particular order)
### ✨ Special Thanks
| Contributors |
| --- |
| [
@wanpengxie](https://github.com/wanpengxie) |
This project follows the [all-contributors](https://github.com/all-contributors/all-contributors) specification. Contributions of any kind welcome!


